
Introduction #
Here’s how I self-host my private web services on a Raspberry Pi with secure access via Tailscale. I like this solution because it strikes a good balance between convenience and security, as well as being easy to manage and it is ridiculously cost-effective, too.
The solution is very modular and you’ll be able to add any containerized web service to it. This guide will use Vaultwarden for demonstration purposes because it’s a good example of a web service that we’d like to protect with an additional layer of network security without making it too awkward to access. Vaultwarden is great, by the way—if you’re not already using it for your password management… well, you should :)
So I’ll show you how to replicate this sweet setup.
There’s a few articles online showing how to achieve something similar, but the main difference is that we’ll be running all our services containerized (including Tailscale and Caddy). This facilitates maintenance and operations, enabling us to manage the solution as IaC. Dockerfiles and Compose YAML definitions for everything are available in the GitHub repo:
Secure access to Vaultwarden and other self-hosted containerized services with Tailscale and Caddy.
While not a particularly advanced solution, this project does have a relatively long list of tasks to perform and although the guide does list out what needs to be done, certain details had to be sacrificed for brevity. It should however be easy to just Google or GPT for hints if you get stuck. Regardless, it’s still probably a good idea to have at least some prior experience with building these kinds of things before diving in.
Let’s get to it :rocket:
What we’ll be building #
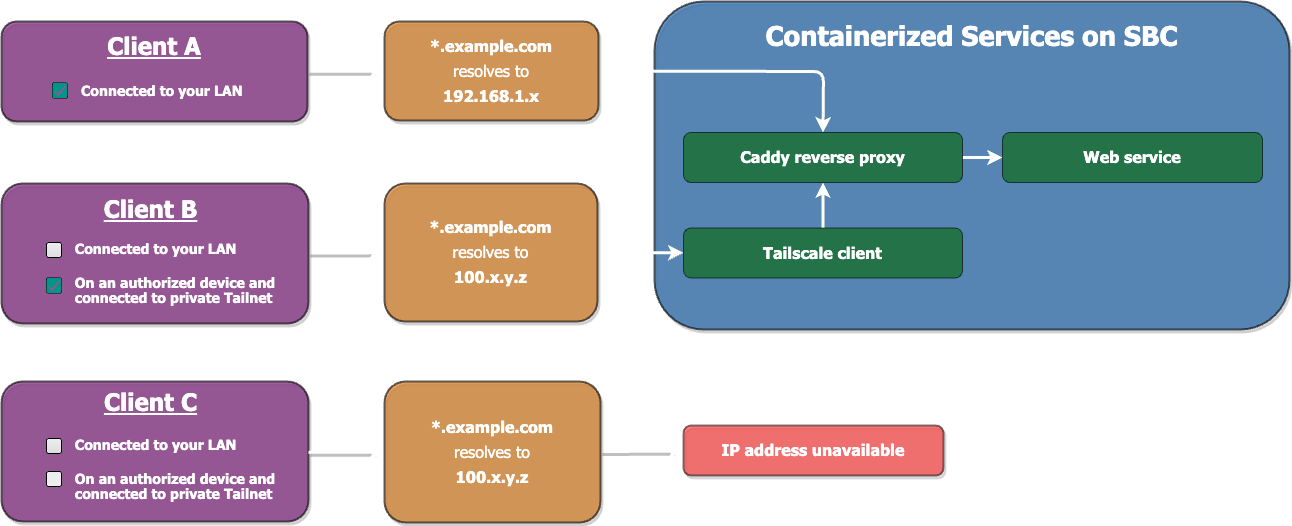
Below follows a brief overview of the solution so that you may assess whether it is suitable for your use case. If not in its entirety, perhaps parts of it will be of interest to you.
-
All services (including Tailscale and Caddy) will be run as Docker containers on a Raspberry Pi connected to your LAN.
-
The services are directly accessible over your LAN connection when you’re at home, or reachable remotely via Tailscale when you’re on the road.
-
The public DNS record resolves to your Raspberry Pi’s private Tailnet IP address and will only be reachable from authorized devices.
Note: This requires you to have a public domain name including the ability to manage its DNS records. -
An internal DNS entry on your LAN will point directly to the static IP of your Raspberry Pi.
Note: This requires a configurable DNS proxy for your LAN, e.g. dnsmasq. Certain home router software (e.g. OpenWRT), or those using a PiHole, can manage these things in their respective web GUIs. Alternatively, just setup dnsmasq on your own or use a configurable service like NextDNS for your LAN’s DNS requests.
-
-
Caddy is used as a reverse proxy for the services. We’ll build a custom image that includes a couple additional modules to facilitate management.
-
We’ll create a wildcard subdomain entry with your public domain’s DNS provider, and configure Caddy to automate renewals for a wildcard certificate covering your subdomains.
-
(Optional) The ability to use your Raspberry Pi as a Tailscale exit node.
Considerations of alternative approaches #
Of course, there’s many ways to skin this cat. Just be aware of possible caveats involved when opting for a different approach, e.g.
- You may want to use a different SBC or other suitable device instead of a Raspberry Pi, which is perfectly fine. You could even use a remote VPS for hosting it, but then your services wouldn’t be available directly over LAN and it adds another provider dependency to the mix. It’s also arguably more cost-effective over the longer term to invest in a SBC as a home server than renting a VPS for years on end.
- Perhaps you’re thinking of not obtaining a public domain name, and instead use Tailscale’s MagicDNS for an internal domain name on your Tailscale network. The issue with that, besides having to use a
*.ts.netdomain name, is that MagicDNS currently doesn’t support multiple subdomains. This means that unless you’re only hosting one single service you’d have to access them using URL paths or ports to let Caddy know which service it should reverse proxy to. Neither does Tailscale currently support custom DNS records, but if they eventually implement this feature it may prove to be a better option. - You may prefer creating individual DNS records and/or certificates for each subdomain instead of wildcarding them. But besides greatly facilitating management, the main advantage of wildcard records and certificates are for privacy/opsec reasons; if we create DNS records or certificates for each subdomain, their public DNS records or public certificate transparency logs would leak potentially descriptive subdomain names, which may be undesirable.
Introducing the stack #
- Tailscale: A Wireguard mesh VPN, granting access to our services from only authorized devices. This will be our main security layer, allowing our services to be reachable from anywhere without publicly exposing them.
- Docker: Docker allows us to run our services as containers. The Compose plugin will facilitate operations and enable service definitions to be managed as IaC.
- Caddy: A powerful open-source web server written in Go. We’ll build a custom Caddy image that includes additional modules;
- The caddy-docker-proxy module that facilitates Caddy reverse proxying to different containers.
- A libdns integration with your DNS provider to automatically manage the issuance and renewal of TLS certificates with the ACME DNS-01 challenge. I use the Cloudflare module, but there are many different providers supported, so chances are you can find yours listed. (If not, you can cronjob LEGO or CertBot instead).
- Vaultwarden: A Rust-implementation of the Bitwarden server, for our self-hosted password management.
Implementation walkthrough #
Raspberry Pi #
-
If you’re starting fresh off a newly-flashed image (recommended), you’ll first want to go through the usual security-related tasks like locking down SSH access (keys only, preventing password and root logins), create a sudo user, enable
ufwfirewall rules, and many other things that are out-of-scope for this article.Tip: You don’t need to open firewall ports for your services because Docker will automatically open them for you if they’re exposed by a service. But do remember to open22or you’ll block SSH access to your Pi :melting_face: -
You may want to update your system packages, and you’ll need
gitto clone the repo. -
Install Docker Engine including the Compose plugin.
-
Clone the repo containing the Caddy Dockerfile and Compose service definitions:
git clone https://github.com/mijolabs/tailscale-caddy-dockerOptional: Move and rename the cloned directory, placing it someplace convenient on your filesystem to facilitate operations.
Tailscale #
-
Follow the Tailscale Quickstart instructions and create an account, or log in to the dashboard if you already have one.
-
Add machines to your network. That means install the Tailscale client on any other devices that you want to authorize for access to your homelab services. Just follow the Tailscale docs for steps on how to do this. You can start with your laptop first and return later to add your phone and whatever else. But don’t add your Raspberry Pi quite yet; we’ll do that in the next step. The procedure is a bit different on this device because we’ll run the client as a containerized service.
-
In your Tailscale dashboard, go to manage your keys, and generate an auth key.
- Make sure Reusable is toggled
OFF. - Set the Expiration to
1day. - Ephemeral should be
OFF. - Pre-approved switched to
ON.
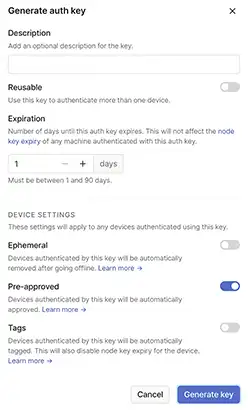
Tailscale auth key generation Click on Generate key, and copy the key value.
- Make sure Reusable is toggled
-
Enter the
tailscale/directory of the cloned repo, edit thedocker-compose.ymlfile and use your generated auth key as theTS_AUTHKEYenvironment variable value. The key will instantly expire after it has been used, but if you like you can just delete this value after the client has been authorized. -
Also change the
TS_HOSTNAMEenvironment variable value to your domain name or anything else you want to use as the identifier for this Tailscale node. -
(Optional) If you don’t plan on using this device as an exit node, you can remove the
TS_EXTRA_ARGSenvironment variable. -
Run
docker-compose up -dto download the image and start it detached. -
Return to the Tailscale dashboard Machines tab and you should see that your new device has been added. Awesome. Click on the dots to the right of it, and Disable key expiry. If you don’t, you’ll need to go through the whole authorization flow again whenever the key expires.
Caddy #
- Create a Docker network for Caddy:
docker network create caddy-network - We need to build a custom Caddy image that includes
caddy-docker-proxyand yourlibdnsprovider integration. Go to thecaddy/directory of the cloned repo and open theDockerfile. Unless you’re using Cloudflare for DNS management like myself, replace the DNS module repo URL with one for your provider. - Visit the
README.mdin the repo for your provider. It will show you which specific attributes and values the module is expecting. - Rename the
.env.examplefile ->.env, and add the attributes and values to it. Replace the existing example inside if you’re not using Cloudflare. - Then modify the
docker-compose.ymlservice definition. You may need to adapt or create additionallabelsdepending on the parameters that your DNS provider needs, and make use of the environment variables that you defined in the previous step to reference their respective values. - Run
docker-compose up -dto start the build process and run it detached.
Vaultwarden #
- Enter the
vaultwarden/directory of the cloned repo. - Edit the
docker-compose.ymlfile and change theDOMAINvariable value to a subdomain of your choice. Use the same value for thecaddy.1_@vaultwardenlabel. - Change any environment variable values to configure Vaultwarden. Refer to the official Wiki to see available settings.
- Run
docker compose up -dto start the service detached.
Public DNS #
Log in to your DNS provider’s dashboard for your domain’s DNS records, and add a wildcard entry that points to the private Tailscale IP of your device.
If you’re using Cloudflare as your DNS provider, add a record looking like this:
| Type | Name | Content |
|---|---|---|
A |
* |
100.x.y.z |
Local DNS #
-
Create a static IP for your Raspberry Pi on your LAN.
-
Create a DNS entry on your network that resolves your domain to that static IP. As mentioned earlier, you should preferably do this with a local DNS resolver, e.g.
dnsmasq. OpenWRT or the PiHole are popular softwares that usednsmasqunder the hood, so you can configure it through their web GUIs.Tip: For those using OpenWRT on their home router, you can manage this in the LuCi’s web GUI. Log in and go to Network -> DHCP and DNS -> General Settings, then add an entry like:/example.com/192.168.1.x, which will work as a wildcard for all subdomains. Alternatively, add the lineaddress=/example.com/192.168.1.xto/etc/dnsmasq.conf.
Verifying access #
Now you should verify that you can reach your services.
- Access via LAN: Make sure you’re connected to your LAN and disconnected from Tailscale, start all container services and browse to your subdomain.
- Access via Tailscale: An easy way to get on a non-LAN connection for testing is to use your mobile phone. On your phone, disconnect from your Wi-Fi network to fall back on its 4G/5G connection, connect to your Tailscale network, and browse to your subdomain.
What’s next #
Adding additional container services #
Let’s use the Vaultwarden service definition as an example. The service definition has a section under services.vaultwarden.labels. This is where we define labels that caddy-docker-proxy merges with the in-memory Caddy configuration.
labels:
  caddy: "*.example.com"

  caddy.1_handle: "@vaultwarden"
  caddy.1_@vaultwarden: "host vault.example.com"
  caddy.1_handle.reverse_proxy: "{{upstreams 80}}"
These lines are required for any additional service definition, but need to be adapted. Let’s go through each line:
| Label | Explanation |
|---|---|
caddy: "*.example.com" |
This label is common for all services and needs to be included in every service definition that is covered by the wildcard certificate. |
caddy.N_* |
The integer in the handle definitions must be unique for each service in order to isolate them in the merged Caddy configuration. It’s easiest to just increment them, e.g. Vaultwarden is your first service so it uses caddy.1_*, your next service will be caddy.2_*, and so on. |
caddy.1_handle: "@vaultwarden" |
Set the handle identifier to a unique value across all your services, e.g. set it to the name of the service. |
caddy.1_@vaultwarden: "host vault.example.com" |
Use the handle identifier to define the subdomain this service should be reachable on. |
caddy.1_handle.reverse_proxy: "{{upstreams 80}}" |
Set the port that Caddy reverse proxies the request to, i.e. the port exposed by the service. |
Let’s take a look at another example. There’s another service included in the repo, for Gitea. Open up gitea/docker-compose.yml and you’ll see:
labels:
  caddy: "*.example.com"

  caddy.2_handle: "@gitea"
  caddy.2_@gitea: "host git.example.com"
  caddy.2_handle.reverse_proxy: "{{upstreams 3000}}"
  caddy_2_handle.reverse_proxy_0: "{{upstreams 2222}}"
- The common wildcard subdomain definition is included.
- The integer in the handle definition is incremented, i.e. it has a different value from other service definitions.
- A unique name has been given to the handle.
- The subdomain is defined.
- The ports exposed by the service have been defined for Caddy to reverse proxy to. As this service exposes multiple ports, we also need to add a unique integer to the
reverse_proxydefinition. The secondreverse_proxylabel has_0prepended to it. If this service required a thirdreverse_proxylabel, we could prepend it with_1.
In addition to this, any additional service definition also needs to specify the common Caddy network:
services:
  identifier:
    networks:
      - caddy-network
and
networks:
  caddy-network:
    external: true
A template for adding new services has been included in the repo root (service-template.yml) that can be seen as a minimal example of a docker-compose.yml service definition for any additional services.
Adding subdomains for remote services #
You may want to create additional subdomains that resolve to other places on the internet instead of to your homelab device. Then you could just create public CNAME records that point to their respective remote hostnames. Everyone browsing to those subdomains will then be sent to the correct destination by the public CNAME record.
But if you’re on your LAN and you have set up your domain to resolve to your Raspberry Pi, your local DNS resolver will direct you to your local device instead.
You could fix this by messing with your local DNS resolver and the Caddy configuration, but a more simple workaround is to just use Tailscale whenever you need to access any of those remote subdomains from your LAN. Just head to your Tailscale DNS settings dashboard and add some public nameservers to be used whenever you’re connected to Tailscale. Then toggle Override local DNS to ON, and the public DNS records for those subdomains would be used instead of your local DNS resolver even if you’re connected to your LAN.
Using the containerized Tailscale client as an Exit Node #
We already specified in the service definition that this Tailscale client should advertise itself as an exit node, but we also need to enable it in the dashboard. Go to the Machines tab and click on the three dots next to your device, and Edit route settings. Toggle Use as exit node to ON.
Providing feedback #
This was a rather lengthy article to write so if you spot any mistakes I made while writing, or anything that can be improved upon in the tutorial or in the service definition files, please feel free to open a discussion thread.